Minden üzenet

samtree 02/05/2020
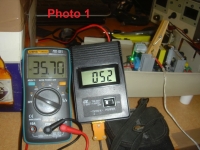
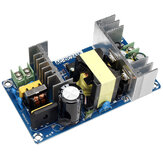
VISUAL INSPECTION : Quality of construction very good, no loose components, no bad solder joints. PERFORMANCE : It worked just out of the box. I left it without load for about 15 minutes and then I coupled three 12 Volts 50 Watts bulbs connected in series. Output 4.2 Amps (150 W). No smoke, no smell, no noise at all, output voltage extremely stable at 35.77 Volts (with no load) and 35.7 Volts (with 4.2 Amps load). So far so very good. Then I tested it more thoroughly with the same setup at 4.2 Amps (no smaller loads). My findings A. Voltage : Extremely stable. B. Cooling : Poor. As other reviewers have said, it can get really hot. After 10 minute at 4.2 amps, the temperature of the output heatsink reached 52 degrees Celsius and was going up (photo 1). Transformer and input heatsink were also too hot, output capacitors also felt hot. I installed above it a 8x8 cm, 24 Volts, 60 mA fan, and now it is really cold – after hours still 31 degrees Celsius. Perfect C. Output ripple (with 20 MHz filter set to ON): Not acceptable. At 4.2 Amps, it is about 850 mVp-p (photo 2), consisting mainly of a sinewave (630 mVp-p, photo 3) and on top of it are added the spikes ( 210 to 250 mVp-p - photo 4) due to the switching frequency. Reason: inadequate output capacitance. By simply adding a 4700 uF capacitor on the output (you can connect it directly to the spare positions on the output connector), the ripple goes down to about 350 mVp-p (photo 5). The quasi-sine wave is now much smaller (ca 50 mVp-p – photo 6), while the spikes remain the same. If you want, you can add on the output an additional LC filter like I did (13,5 mH inductor from the junkbox + 1000 uF capacitor), and go down to less than 160 mVp-p overall ripple (photo 7) because spikes are now 130 mVp-p or less (photo 8). Not bad. Conclusion : Add a fan and a 4700 uF output capacitor, and you have a decent general purpose 36 Volts Power Supply, with enough output current and for a very low price.
26
Ajánlások
Hozzászólások (0)
samtree 28/08/2021
I bought this to experiment with old HDD and CD motors. The product worked just out of the box, without any problem. It is true that in the low RPMs area adjustment is not so good, but still you can lower the RMPs considerably. I let the motor run freely at 12 Volts and full speed for about half an hour, and the PCB was just a little bit warm to the touch (not much). The current was about 450 mA, but at motor startup it went up as high as 1.1 to 1.15 Amps. The interesting (and very good) thing is that the overcurrent protection works like a charm. I stalled the motor (by stopping the rotating disk with my hand) and the current went up to 1.15 Amps – and no more. Very nice. Which means that if you make, for example, a grinder, and at some point in time you accidentally stall the motor or force it to run at low RPMs for some time, you do not run the risk of frying the module. I have to mention that before putting the module into operation, and having read the comments of EdLuke for this module on how to avoid module failures during startup (you can find them here in the “Reviews Section”), I put a low ESR 3300uf, 25 Volts capacitor across the power input (you can see it in the photo). As this comment is old enough (2016) maybe the problem has been corrected now, but to be sure I still have to check with an oscilloscope. Nevertheless, placing a capacitor is an easy job, so fine with me – and if in fact has to stay there, you can always solder it on the back side of the PCB. And finally, a BIG THUMBS UP for shipping. This is the first time I experienced shipment with Banggod Express, and all I can say is “Congratulations”. So, five stars for everything, and Thank You Banggood.
3
Ajánlások
Hozzászólások (1)
samtree 13/06/2020
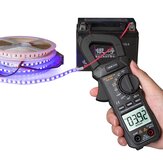
AMAZING. That’s all. I bought it because I needed a clamp ammeter that can measure both AC and DC, and it proved to be much more. Well built, of solid construction, the ammeter readings are very close to the real ones obtained with a normal cabled ammeter, and it is also an accurate voltmeter, capacitor meter and resistance meter. Apart from that, you can have a square wave swinging between +- 1,5 Volts (+- half the battery supply voltage of the instrument). But what really surprised me, is the frequency counter function. Not only it does very accurately measure the frequency and the duty cycle (tested it with 5 Volts square wave, up to 80 kHz, against an oscilloscope), but it can also measure a wave that does not cross the 0 Volts axis. I measured a 2 kHz (actually 2.012 kHz) square wave, with its HIGH at 5.3 Volts and its LOW at 1.96 Volts, and the little devil measured it !!!! Precisely!!. (see photos 1 – the oscilloscope- and 2 – this ammeter). I do not know of any other general purpose instrument with frequency measurement as a “bonus feature” that can do that (my precious ANENG 8002, among others, cannot). So, next time I want to make a quick check on the triggering of a MOSFET gate, I will not have to take out my oscilloscope. I have only a note on the manual (which BTW is good) : On the last page it says “Current is not input” --> “replace fuse”. Well, there is not any fuse in it – I opened it and checked. Which was expected, as there is not any actual “high” current flowing through the instrument, what is actually flowing and measured are small induced currents – hence no fuse needed.. Overall impression : Excellent instrument, unbeatable value for money. How do I feel ? Very happy. My rating : 5++++. Thank you, Banggood.
2
Ajánlások
Hozzászólások (0)
samtree 23/06/2020
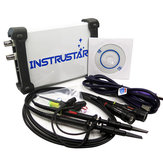
TIP OF ADVICE Download from INSTRUSTAR and install the software before buying – to make sure that it will work. The download package also contains a lot of documentation on the use of the Oscilloscope. OVERALL IMPRESSION: It does a great job, considering the price, and fully covers my needs. OSCILLOSCOPE PERFORMANCE : It saturates at +- 6 Volts, so by using the 10X probe you can measure up to +- 60 Volts. The curve is somewhat “hairy” but that’s OK.If you want to go higher than that, buy from Banggood a “Hantek HT-201 300V 20:1 Passive Attenuator for Oscilloscopes” (I bought two of them). EASE OF USE: Documentation could be better, but still helps. You have to experiment a little bit, but it is fairly easy. I use the “simplified S/W version. Having the entire laptop screen area to work with (mine is 17”) is simply magical. There are still features I have not discovered yet – like the “Capture” function. SPECTRUM ANALYZER: I had never used one before. I experimented a little bit, it seems to work. RECORDER: This is what I like the most. Many times, a lot of interesting things happen berore and after the trigger point, and with a normal digital oscilloscope it is hard to catch them all. Here, you can set the recording length so that you start recording before the event and stop after. Then you can analyze the whole thing by studying the parts you need, by magnifying both time and voltage. One disadvantage: The input voltage must be between minus 6 and plus 6 Volts, so you may have to set the probes to 10x (or use the 20:1 attenuator) and then multiply the readings accordingly. See attached photos of what happens at the MOSFET gate (CH1 - yellow) and the MOSFET Drain-to-Source (CH2 - blue) of an electronic fuse at short-circuit. Photo 1 is a 3 seconds recording, and Photo 2 is the magnification of the time of the short-circuit. You can even use the Cursors the take measurements (here, the fuse cut-off time). So, for me, 5+ stars and Thank You, Banggood.
1
Ajánlások
Hozzászólások (0)